Building an AJAX web part with jQuery (Part 3)
In part 1 of this series I explained a bit about the context and goal of creating an AJAX web part without using ASP.Net AJAX. I also showed the steps necessary for creating services that return data in the JSON format. In part 2 I showed you how to call these services from JavaScript and render the HTML for the data. In this last part I’ll show you how to use the jQuery UI and validation plugins.
jQuery UI
The jQuery UI plugin provides some useful widgets and effects to use in your jQuery based scripts. It also offers an advanced theme framework, so you don’t have to write all the css by yourself. You can use one of the included theme’s or roll your own with the ThemeRoller.
I’ve decided to use the UI plugin for tree things in my web part:
- Datepicker widget to specify the orderdate
- Dialog widget to show confirmation dialogs, edit forms and validation messages
- Highlighting effect to focus the users attention to changing data, such as the shoppingcart
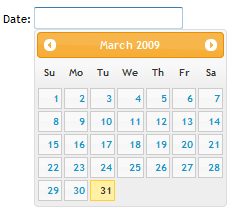
Datepicker
The datepicker enhances a standard text input box with a datapicker that slides out when the textbox receives focus. It contains different options for specifying the allowed dates, year/month selection and more. When it’s shown it will look like this:
Linking it to your input box is very simple. I use the following code:
$("#bpvorderdate").datepicker({
	showOn: 'button',
	minDate: +1, dateFormat: 'dd/mm/yy',
	buttonImage: '/_layouts/images/calendar.gif',
	buttonImageOnly: true
});
In this case, the user has to press a button (in this case an imagebutton) to open the datepicker.
Dialogs
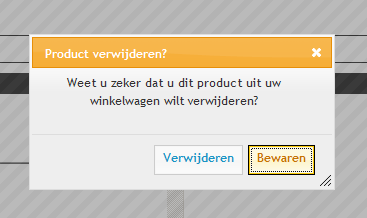
Dialogs are a very useful way to give feedback to the user or asking for confirmation. In my web part I want to show a confirmation dialog when a user presses the delete icon next to a product in the shoppingcart or the “clear shoppingcart” button. The user will be presented with the following dialog:
Showing this is very easy. First we create a function that is called when the page is initialized:
function initializeDeleteItemDialog() {
	var doOk= function() {
		var paramsdata = {
			"productId" : $("#bpvremoveitemid").val()
		}
		$.ajax({
			type: "POST", url: "/_layouts/intranet2009/bpvshoppingcart.asmx/DeleteItem",
			data: JSON.stringify(paramsdata),
			contentType: "application/json;charset=utf-8",
			dataType: "json",
			success:rendershoppingcart,
			error: showError
		});
		$("#bpvremoveitemdialog").dialog("close");
	}
	var doCancel = function()
	{
		$("#bpvremoveitemdialog").dialog("close");
	}
	var dialogOpts = {
		modal: true,
		buttons: {"Bewaren": doCancel, "Verwijderen": doOk},
		autoOpen: false
	}
	$("#bpvremoveitemdialog").dialog(dialogOpts);
}
We first specify the code to execute when the user presses the Ok button. In this case we’ll call the DeleteItem method of the shoppingcart web service and then close the dialog. The Cancel button will close the dialog straight away. In the dialog options we specify the buttons with their callback. Then we hook up the dialog to the html element we want to show. The html is written out in the Render method of the web part:
writer.WriteLine(“<div id=\”bpvremoveitemdialog\” title=\”Product verwijderen?\”>”);
writer.WriteLine(“Weet u zeker dat u dit product uit uw winkelwagen wilt verwijderen?”);
writer.WriteLine(“<input type=\”hidden\” id=\”bpvremoveitemid\”/>”);
writer.WriteLine(“</div>”);
To open the dialog we just have to call the dialog method again with “open” as parameter:
function removeProduct(element) {
	$("#bpvremoveitemid").val($(element).attr("productid") );
	$("#bpvremoveitemdialog").dialog("open");
}
Validation
Validation of your inputs is supposed to be really easy with the validation plugin. Unfortunately this doesn’t count when you combine it with ASP.Net Webforms. With the validation plugin you attach the validation to a form within your html. Because ASP.Net Webforms uses one form tag for the entire page, this doesn’t allow you to set validation to a group of elements that would normally be contained within their own form tag. The solution I came up with for now only validates 1 element at a time. If you now of a way to assign one validation and remove it again before assigning a new validation, let me know.
First we hook up all the validations we want on the form and we specify a custom validation rule, called dutchDate:
$.validator.addMethod(
"dutchDate", function(value,element)
{ return value.match(/^\d\d?\/\d\d?\/\d\d\d\d$/);},
"Voer een datum in van het formaat dd/mm/yyyy" );
$("form").validate({
	onsubmit: false,
	onfocusout: false,
	onkeyup: false,
	onclick: false,
	showErrors: showValidationError,
	rules: {
		bpvproductamount: {
			required: true,
			number: true
		},
		bpvproductid: {
			required: true
		},
		bpvorderdate: {
			required: true,
			dutchDate: true
		}
	},
	messages: {
		bpvproductamount: {
			required: "Aantal is een verplicht veld",
			number: "Aantal moet een getal zijn"
		},
		bpvproductid: {
			required: "U heeft geen product geselecteerd" },
			bpvorderdate: {
				required: "Bezorg-/ophaaldatum is een verplicht veld",
				dutchDate: "Bezorg-/ophaaldatum moet in het formaat dd/mm/yyyy zijn"
			}
		}
	});
I only want the validation to occur when I call it on specific elements from code, so we specify false on every event it normally triggers on. When there are errors, I want to call a showValidationError function that shows the errors in a dialog box. Then we specify the rules and the messages we want to show when the rule isn’t matched. “bpvproductamount” equals the name attribute of the input element.
To call the validation we use the element method of the validation plugin:
if ($("form").validate().element("#txtbpvproductid") && $("form").validate().element("#txtbpvproductamount"))
{
	// valid, so perfom actions
}
As soon as an element doesn’t pass validation, the method we attached to the showErrors event is called. Unfortunately this means only one error at a time will popup if multiple elements don’t pass validation. To show the validation messages, we’ll make use of the Dialog widget once again:
function showValidationError(errorMap, errorList)
{
	var message = "";
	var i;
	for(i=0; i < errorList.length; i++) {
		message += errorList[i].message + " ";
	}
	if (message.length > 0) {
		showMessage(message);
	}
}
Conclusion
Building an AJAX web part with jQuery (and some plugins) can result in a very responsive UI with a good user experience. In the end, I don’t think building a web part with ASP.Net AJAX would have taken me less time as well. I’m not happy with the validation though. Although the jQuery validation plugin is very useful in most web frameworks (including ASP.Net MVC), it seems that it doesn’t combine well with web forms. But I haven’t been able to find a better plugin for it.