In this post I’ll show you how to create a project in Visual Studio 2010 with the new SharePoint project and item templates to provision a Document Set from a feature.
DISCLAIMER: The examples are build on and tested against a Beta 1 build of SharePoint 2010 and a Beta 1 build of Visual Studio 2010, so there is no guarantee this will work on later versions or even on the Beta 1 build you’re running.
A Document Set is basically a content type just like all the others you can find in SharePoint, it derives from the Folder content type. So the steps you need to take to provision a Document Set content type are not that different as well.
We’ll start out by creating an empty SharePoint project in Visual Studio 2010 and work from there.
First we’ll add a Content Type item to the project. In the elements.xml file we place the following content:
<?xml version="1.0" encoding="utf-8"?>
<elements xmlns="http://schemas.microsoft.com/sharepoint/">
	<contentType ID="0x0120D520002228EBDE71841343B23171CE351F7D39" Name="Test Doc Set" Group="Document Set Content Types" Version="2" ProgId="SharePoint.DocumentSet">
		<folder TargetName="_cts/Test Doc Set" />
		<fieldRefs>
			<fieldRef ID="{038d1503-4629-40f6-adaf-b47d1ab2d4fe}" Name="Company" />
		</fieldRefs>
		<xmlDocuments>
			<xmlDocument NamespaceURI="http://schemas.microsoft.com/sharepoint/events">
				<spe:Receivers xmlns:spe="http://schemas.microsoft.com/sharepoint/events">
				<receiver>
					<name>DocumentSet ItemUpdated</name>
					<synchronization>Synchronous</synchronization>
					<type>10002</type>
					<sequenceNumber>100</sequenceNumber>
					<assembly>Microsoft.Office.DocumentManagement, Version=14.0.0.0, Culture=neutral, PublicKeyToken=71e9bce111e9429c</assembly>
					<class>Microsoft.Office.DocumentManagement.DocumentSets.DocumentSetEventReceiver</class>
					<data />
					<filter />
				</receiver>
				<receiver>
					<name>DocumentSet ItemAdded</name>
					<synchronization>Synchronous</synchronization>
					<type>10001</type>
					<sequenceNumber>100</sequenceNumber>
					<assembly>Microsoft.Office.DocumentManagement, Version=14.0.0.0, Culture=neutral, PublicKeyToken=71e9bce111e9429c</assembly>
					<class>Microsoft.Office.DocumentManagement.DocumentSets.DocumentSetItemsEventReceiver</class>
					<data />
					<filter />
				</receiver>
			</spe:Receivers>
		</xmlDocument>
		<xmlDocument NamespaceURI="http://schemas.microsoft.com/office/documentsets/allowedcontenttypes">
			<act:AllowedContentTypes xmlns:act="http://schemas.microsoft.com/office/documentsets/allowedcontenttypes" LastModified="11/4/2009 3:30:17 PM">
			<allowedContentType id="0x0101" />
		</act:AllowedContentTypes>
	</xmlDocument>
	<xmlDocument NamespaceURI="http://schemas.microsoft.com/office/documentsets/sharedfields">
		<sf:SharedFields xmlns:sf="http://schemas.microsoft.com/office/documentsets/sharedfields" LastModified="11/4/2009 3:31:50 PM">
		<sharedField id="cbb92da4-fd46-4c7d-af6c-3128c2a5576e" />
		<sharedField id="038d1503-4629-40f6-adaf-b47d1ab2d4fe" />
	</sf:SharedFields>
</xmlDocument>
<xmlDocument NamespaceURI="http://schemas.microsoft.com/office/documentsets/welcomepagefields">
	<wpf:AllowedContentTypes xmlns:wpf="http://schemas.microsoft.com/office/documentsets/welcomepagefields" LastModified="11/4/2009 3:31:50 PM">
	<welcomePageField id="038d1503-4629-40f6-adaf-b47d1ab2d4fe" />
</wpf:AllowedContentTypes>
</xmlDocument>
<xmlDocument NamespaceURI="http://schemas.microsoft.com/office/documentsets/defaultdocuments">
	<dd:DefaultDocuments xmlns:dd="http://schemas.microsoft.com/office/documentsets/defaultdocuments" LastModified="11/5/2009 8:39:24 AM" AddSetName="True">
	<defaultDocument name="Enterprise Content Management.docx" idContentType="0x0101" />
	<defaultDocument name="Extending Search.docx" idContentType="0x0101" />
</dd:DefaultDocuments>
</xmlDocument>
<xmlDocument NamespaceURI="http://schemas.microsoft.com/sharepoint/v3/contenttype/forms">
<formTemplates xmlns="http://schemas.microsoft.com/sharepoint/v3/contenttype/forms">
	<display>DocSetDisplayForm</display>
	<edit>ListForm</edit>
	<new>DocSetDisplayForm</new>
</formTemplates>
</xmlDocument>
<xmlDocument NamespaceURI="http://schemas.microsoft.com/sharepoint/v3/contenttype/forms/url">
<formUrls xmlns="http://schemas.microsoft.com/sharepoint/v3/contenttype/forms/url">
	<new>_layouts/NewDocSet.aspx</new>
</formUrls>
</xmlDocument>
</xmlDocuments>
</contentType>
</elements>
As you can see, the basics are the same as for any content type. The main difference is in all the XmlDocument elements in there:
- Some event handlers are hooked up to make sure the metadata gets pushed down into the child documents (plus some other stuff)
- The content types that users are allowed to add to the set are specified
- We specify which fields are shared between the documents the set contains
- The fields that are shown on the welcome page are defined as well
- We then specify if there’s default content to add when a new Document Set is created
After we’ve created the basic plumbing for the Document Set content type, we’ll need to make sure that the files that are required are created in the right place as well. In order to accomplish this we’ll add a SharePoint Module item to the solution. This module will create the welcome page and default content in the right location in the site collection. The element.xml file will contain the following content:
<?xml version="1.0" encoding="utf-8"?>
<elements xmlns="http://schemas.microsoft.com/sharepoint/">
	<module Name="_ctsTest Doc Set_" HyperlinkBaseUrl="http://moss.contoso.com/sites/docsettest" Path="WelcomePages\Files\_cts\Test Doc Set" Url="_cts/Test Doc Set">
		<file Url="docsethomepage.aspx" Path="docsethomepage.aspx">
			<allUsersWebPart WebPartOrder="0" WebPartZoneID="WebPartZone_TopLeft" ID="g_ae6da3d4_9233_45d6_b9fd_6300815e16c6">
				<![CDATA[Content omitted]]>
			</allUsersWebPart>
			<allUsersWebPart WebPartOrder="0" WebPartZoneID="WebPartZone_CenterMain" ID="g_d8062545_cc87_4e82_9c55_cae80486ffea">
				<![CDATA[Content omitted]]>
			</allUsersWebPart>
			<allUsersWebPart WebPartOrder="0" WebPartZoneID="WebPartZone_Top" ID="g_651be1ba_c8bb_4d29_87b0_87c769cd5179">
				<![CDATA[Content omitted]]>
			</allUsersWebPart>
		</file>
		<file Path="Enterprise Content Management.docx" Url="Enterprise Content Management.docx" />
		<file Path="Extending Search.docx" Url="Extending Search.docx" />
	</module>
</elements>
We see that the page layout for the document set homepage is created in the _cts folder for the content type. The web parts that are placed on the page are configured here as well, so any modifications and additions will be used on the welcome page of all document sets based in this content type. Also the two documents for the default content are placed in the corresponding _cts folder in the site collection.
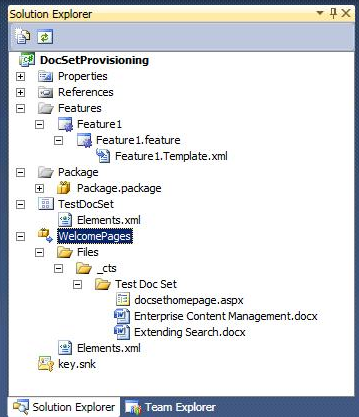
The final Visual Studio solution will look like this:
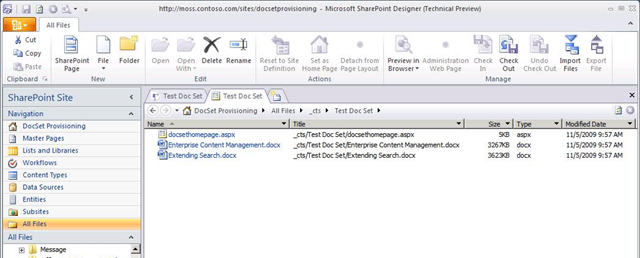
After deploying the solution and activating the feature, which is very easy to do with the new SharePoint stuff in Visual Studio (just press ctrl + f5), we can see that the _cts folder will be created in the site collection:
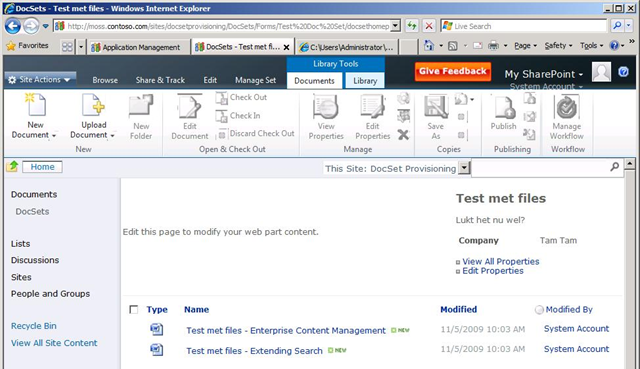
After we add the content type to a document library and create a new item based on the content type we’ll be presented with the following:
You can download the sample solution here: DocSetProvisioning.zip (62,88 KB)
DISCLAIMER: This hasn’t been properly tested, so there’s is no guarantee it will work. If it f@#@s up your farm, the most you can expect as support from me, is an email wishing you good luck with restoring it.