Dave Ward has published a very good article about jQuery for ASP.Net developers on the MIX site. I found the part about unobtrusive JavaScript particularly useful.

With the recent improvements in ASP.Net for JSON and the ease of jQuery, all ASP.Net developers should embrace JavaScript for creating better user interfaces.

You can find the article here: http://visitmix.com/Opinions/What-ASPNET-Developers-Should-Know-About-jQuery

Recently Steve Peschka of the SharePoint Team blogged about improvements in Office client integration when you’re using Forms Based Authentication.

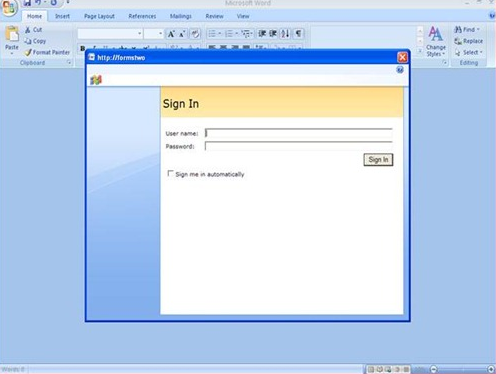
After installing an update for the Office Clients you are now prompted with a login box when you edit an Office document on a SharePoint site that uses FBA:

Login box

When you have a customized login page this will be shown instead, so users won’t be (or will be less) confused when they get a login form with your company’s branding applied.

Read more about it here: http://blogs.msdn.com/sharepoint/archive/2009/05/13/update-on-sharepoint-forms-based-authentication-fba-and-office-client.aspx

I just found out that the object model includes some very useful classes to speed up your coding efforts.

SPUtilty

Contains methods for redirecting users to the error page, access denied page or a custom url. You can get Full name and email adres of a user by passing in the logginname, send an email from the web context or determine if an lcid is an East-Asian lcid.

More information here: http://msdn.microsoft.com/en-us/library/microsoft.sharepoint.utilities.sputility.aspx

SPBuiltinFieldId

Contains variables for all the Guids of the built in fields. No need to worry about the difference between dutch and english MOSS sites.

SPBuiltInContentTypeId

Contains variables for all the Guids of the built-in contenttypes.

SPDiffUtilty

Shows the differences between two strings in Html format. So comparing “This is an initial string” with “This” returns the following: “This is an initial string

SPContentTypeId (structure)

Provides methods to determine the relationships between two contenttypes.

SPContentTypeUsage

Allows you to determine where contenttypes are used within the sitecollection. Here’s a useful post that shows code to audit the contenttype hierarchy: http://soerennielsen.wordpress.com/2008/03/06/audit-your-content-type-hierarchy/

SPChangeQuery

Allows you to query your sitecollection for objects that have changed. This way you can audit changes in access rights for instance.

In part 1 of this series I explained a bit about the context and goal of creating an AJAX web part without using ASP.Net AJAX. I also showed the steps necessary for creating services that return data in the JSON format. In part 2 I showed you how to call these services from JavaScript and render the HTML for the data. In this last part I’ll show you how to use the jQuery UI and validation plugins.

jQuery UI

The jQuery UI plugin provides some useful widgets and effects to use in your jQuery based scripts. It also offers an advanced theme framework, so you don’t have to write all the css by yourself. You can use one of the included theme’s or roll your own with the ThemeRoller.

I’ve decided to use the UI plugin for tree things in my web part:

  • Datepicker widget to specify the orderdate
  • Dialog widget to show confirmation dialogs, edit forms and validation messages
  • Highlighting effect to focus the users attention to changing data, such as the shoppingcart

Datepicker

The datepicker enhances a standard text input box with a datapicker that slides out when the textbox receives focus. It contains different options for specifying the allowed dates, year/month selection and more. When it’s shown it will look like this:
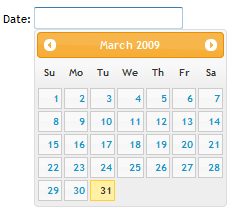
Datepicker

Linking it to your input box is very simple. I use the following code:

$("#bpvorderdate").datepicker({
	showOn: 'button',
	minDate: +1, dateFormat: 'dd/mm/yy',
	buttonImage: '/_layouts/images/calendar.gif',
	buttonImageOnly: true
});

In this case, the user has to press a button (in this case an imagebutton) to open the datepicker.

Dialogs

Dialogs are a very useful way to give feedback to the user or asking for confirmation. In my web part I want to show a confirmation dialog when a user presses the delete icon next to a product in the shoppingcart or the “clear shoppingcart” button. The user will be presented with the following dialog:
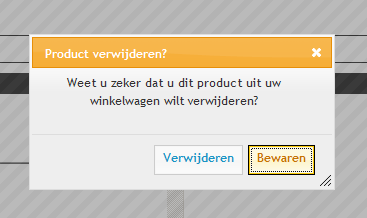
Dialog

Showing this is very easy. First we create a function that is called when the page is initialized:

function initializeDeleteItemDialog() {
	var doOk= function() {
		var paramsdata = {
			"productId" : $("#bpvremoveitemid").val()
		}
		$.ajax({
			type: "POST", url: "/_layouts/intranet2009/bpvshoppingcart.asmx/DeleteItem",
			data: JSON.stringify(paramsdata),
			contentType: "application/json;charset=utf-8",
			dataType: "json",
			success:rendershoppingcart,
			error: showError
		});
		$("#bpvremoveitemdialog").dialog("close");
	}
	var doCancel = function()
	{
		$("#bpvremoveitemdialog").dialog("close");
	}
	var dialogOpts = {
		modal: true,
		buttons: {"Bewaren": doCancel, "Verwijderen": doOk},
		autoOpen: false
	}
	$("#bpvremoveitemdialog").dialog(dialogOpts);
}

We first specify the code to execute when the user presses the Ok button. In this case we’ll call the DeleteItem method of the shoppingcart web service and then close the dialog. The Cancel button will close the dialog straight away. In the dialog options we specify the buttons with their callback. Then we hook up the dialog to the html element we want to show. The html is written out in the Render method of the web part:

writer.WriteLine(<div id=\”bpvremoveitemdialog\” title=\”Product verwijderen?\”>);
writer.WriteLine(Weet u zeker dat u dit product uit uw winkelwagen wilt verwijderen?);
writer.WriteLine(<input type=\”hidden\” id=\”bpvremoveitemid\”/>);
writer.WriteLine(</div>);

To open the dialog we just have to call the dialog method again with “open” as parameter:

function removeProduct(element) {
	$("#bpvremoveitemid").val($(element).attr("productid") );
	$("#bpvremoveitemdialog").dialog("open");
}

Validation

Validation of your inputs is supposed to be really easy with the validation plugin. Unfortunately this doesn’t count when you combine it with ASP.Net Webforms. With the validation plugin you attach the validation to a form within your html. Because ASP.Net Webforms uses one form tag for the entire page, this doesn’t allow you to set validation to a group of elements that would normally be contained within their own form tag. The solution I came up with for now only validates 1 element at a time. If you now of a way to assign one validation and remove it again before assigning a new validation, let me know.

First we hook up all the validations we want on the form and we specify a custom validation rule, called dutchDate:

$.validator.addMethod(
"dutchDate", function(value,element)
{ return value.match(/^\d\d?\/\d\d?\/\d\d\d\d$/);},
"Voer een datum in van het formaat dd/mm/yyyy" );
$("form").validate({
	onsubmit: false,
	onfocusout: false,
	onkeyup: false,
	onclick: false,
	showErrors: showValidationError,
	rules: {
		bpvproductamount: {
			required: true,
			number: true
		},
		bpvproductid: {
			required: true
		},
		bpvorderdate: {
			required: true,
			dutchDate: true
		}
	},
	messages: {
		bpvproductamount: {
			required: "Aantal is een verplicht veld",
			number: "Aantal moet een getal zijn"
		},
		bpvproductid: {
			required: "U heeft geen product geselecteerd" },
			bpvorderdate: {
				required: "Bezorg-/ophaaldatum is een verplicht veld",
				dutchDate: "Bezorg-/ophaaldatum moet in het formaat dd/mm/yyyy zijn"
			}
		}
	});

I only want the validation to occur when I call it on specific elements from code, so we specify false on every event it normally triggers on. When there are errors,  I want to call a showValidationError function that shows the errors in a dialog box. Then we specify the rules and the messages we want to show when the rule isn’t matched. “bpvproductamount” equals the name attribute of the input element.

To call the validation we use the element method of the validation plugin:

if ($("form").validate().element("#txtbpvproductid") && $("form").validate().element("#txtbpvproductamount"))
{
	// valid, so perfom actions
}

As soon as an element doesn’t pass validation, the method we attached to the showErrors event is called. Unfortunately this means only one error at a time will popup if multiple  elements don’t pass validation. To show the validation messages, we’ll make use of the Dialog widget once again:

function showValidationError(errorMap, errorList)
{
	var message = "";
	var i;
	for(i=0; i < errorList.length; i++) {
		message += errorList[i].message + " ";
	}
	if (message.length > 0) {
		showMessage(message);
	}
}

Conclusion

Building an AJAX web part with jQuery (and some plugins) can result in a very responsive UI with a good user experience. In the end, I don’t think building a web part with ASP.Net AJAX would have taken me less time as well. I’m not happy with the validation though. Although the jQuery validation plugin is very useful in most web frameworks (including ASP.Net MVC), it seems that it doesn’t combine well with web forms. But I haven’t been able to find a better plugin for it.
In part 1 of this series I explained a bit about the context and goal of creating an AJAX web part without using ASP.Net AJAX. I also showed the steps necessary for creating services that return data in the JSON format. In this post I’ll show you how to call these services from JavaScript and insert the data in the HTML placeholders rendered by the web part.

Calling the generic handler for products and categories

jQuery offers various methods to perform asynchronous calls to web resources. To retrieve JSON the most used are jQuery.ajax and jQuery.getJSON. The last one uses a HTTP GET request and is simpler to use, the jQuery.ajax method offers more options/flexibility. For retrieving the product categories and the products, I’ve decided to go with getJSON. The code for retreiving the categories looks as follows:

function showProductCategories() {
	$.getJSON(bpvweburl + "/_layouts/intranet2009/bpv.ashx",
	{type: "categories"},
	function(data)
	{
		var categoriescontainer = $("#bpvcategoriescontainer");
		categoriescontainer.empty();
		var list = categoriescontainer.append($("#bpvcategorytemplate").html());
		var directive = {'a.context[onclick]' : '"showProducts(this);return false;"'};
		list.autoRender( data, directive );
	});
}

The first line is responsible for calling the handler. It specifies a inline callback method to handle the returned data. The JSON returned is processed by the PURE templating plugin. I’ve blogged about using this before.

Calling the shopping cart web service

For getting the data from the web service, we’ll use the jQuery.ajax method. That’s because we need to do a HTTP POST request as well as specify some other options for the request. For more information see this post by Dave Ward. To initially load the shopping cart we use the following code:

function loadShoppingcart()
{
	$.ajax({
		type: "POST",
		url: "/_layouts/ecabointranet2009/bpvshoppingcart.asmx/GetItems",
		data: "{}",
		contentType: "application/json; charset=utf-8",
		dataType: "json",
		success: rendershoppingcart,
		error: showError
	});
}
function rendershoppingcart(msg) {
	var cartcontainer = $("#bpvcartcontent");
	cartcontainer.empty();
	if (msg.d.length > 0)
	{
		var cartitemslist = cartcontainer.append($("#bpvcarttemplate").html());
		var directives = {
			'a.bpvedit[onclick]' : '"editAmount(this); return false;"',
			'a.bpvremove[onclick]' : '"removeProduct(this); return false;"'
		}
		cartitemslist.autoRender( msg.d, directives );
	}
	else
	{
		cartcontainer.append("U heeft nog geen producten in uw winkelwagen");
	}
	$("#bpvcartcontent").effect("highlight", {color: "#ffcf57"}, 700, null);
}
function showError(xhr, status, error)
{
	var err = eval("(" + xhr.responseText + ")");
	$("#bpverrordialog span.errormessage").html(err.Message);
	$("#bpverrordialog").dialog("open");
}

As you can see we post to the GetItems method of the asmx. We need to specify a empty JSON object as data (more information on that in this post, again by Dave Ward) and specify the contentType we want returned. When the AJAX call returns an error, we’ll call the showError method (which uses the jQuery UI dialog widget I’ll tell more about in part 3). When the call is successful, the rendershoppingcart method is called. This checks if the cart is empty, so we can display a message in that case, or uses PURE again for rendering the cart contents. To provide visual feedback to the user when the cart is updated, we’ll use the highlight effect on the cart to attract the attention of the user. If we want to pass in parameters with an AJAX call (like the productId when we want to delete an item from the cart), we need to construct a parameters object and serialize that as string for usage in the call:

var paramsdata = { "productId" : $("#bpvremoveitemid").val() }
$.ajax({
	type: "POST",
	url: "/_layouts/ecabointranet2009/bpvshoppingcart.asmx/DeleteItem",
	data: JSON.stringify(paramsdata),
	contentType: "application/json; charset=utf-8",
	dataType: "json",
	success: rendershoppingcart,
	error: showError
});

As you can see, we use a JSON.stringify method for serializing the object as a string.

You can download the scriptfile needed for this from JSON.org.

All the other methods in the web service are called in the same way, so there’s no need to inundate you with more code on that. The only thing left is to show you parts of the contents of the Render method in the webpart:

 // Templates
 // Categorylist template
 writer.WriteLine("<div id=\"bpvcategorytemplate\" style=\"display: none;\">");
 writer.WriteLine("<h3>Productcategorie</h3>");
 writer.WriteLine("<ul><li class=\"context\"><a href=\"#\" class=\"context context@category\">laden...</a></li></ul>");
 writer.WriteLine("</div>");
 // Productlist template
 writer.WriteLine("<div id=\"bpvproducttemplate\" style=\"display: none;\">");
 writer.WriteLine("<h3>Product</h3>");
 writer.WriteLine("<ul><li class=\"context\"><a href=\"#\" class=\"Title ID@productid Description@description Code@productcode AttachmentUrl@imageurl\">geen items</a></li></ul>");
 writer.WriteLine("</div>");
 // Shoppingcart template
 writer.WriteLine("<div id=\"bpvcarttemplate\" style=\"display: none;\">");
 writer.WriteLine("<h3>Informatie en bestellen</h3>");
 writer.WriteLine("<table><thead><tr><td class=\"ProductName\">Product</td><td>Aantal</td><td></td></tr></thead><tbody class=\"d\">");
 writer.WriteLine("<tr class=\"context\"><td class=\"ProductName\">naam</td><td class=\"Amount\">aantal</td><td><a href=\"#\" class=\"bpvedit ProductID@productid Amount@amount\"><img src=\"/_layouts/images/ecabo/2009/page-edit.gif\" /></a> <a href=\"#\" class=\"bpvremove ProductID@productid\"><img src=\"/_layouts/images/ecabo/2009/bin.gif\" /></a></td></tr>");
 writer.WriteLine("</tbody></table>");
 writer.WriteLine("</div>");
 // Item selector
 writer.WriteLine("<div id=\"bpvitemselector\">");
 writer.WriteLine("<h2>1. Selecteer uw producten</h2>");
 writer.WriteLine("<div id=\"selector\">");
 writer.WriteLine("<div id=\"bpvcategoriescontainer\"><h3>Productcategorie</h3></div>");
 writer.WriteLine("<div id=\"bpvproductscontainer\"><h3>Product</h3></div>");
 writer.WriteLine("</div>");
 writer.WriteLine("<div id=\"bpvproductinfo\"><h3>Informatie en bestellen</h3>");
 writer.WriteLine("<img src=\"/_layouts/images/blank.gif\" id=\"bpvproductimage\"/>");
 writer.WriteLine("<span class=\"title\" id=\"bpvproducttitle\"></span>");
 writer.WriteLine("<span class=\"description\"  id=\"bpvproductdescription\" /></span>");
 writer.WriteLine("<label class=\"amount\">Aantal:</label><input type=\"text\" id=\"txtbpvproductamount\" name=\"bpvproductamount\"/>");
 writer.WriteLine("<input type=\"hidden\" id=\"txtbpvproductid\" name=\"bpvproductid\"/>");
 writer.WriteLine("<input type=\"hidden\" id=\"txtbpvproductcode\" />");
 writer.WriteLine("<input type=\"button\" id=\"bpvaddproduct\" value=\"Voeg toe\"/>");
 writer.WriteLine("</div>");
 writer.WriteLine("</div>");
 // Shoppingcart
 writer.WriteLine("<div id=\"bpvshoppingcart\">");
 writer.WriteLine("<h2>2. Lijst met uw bestelling</h2>");
 writer.WriteLine("<div id=\"bpvcartcontent\"><span>U heeft nog geen producten in uw winkelwagen</span></div>");
 writer.WriteLine("<a id=\"clearcart\" href=\"#\" onclick=\"clearCart(); return false;\">Alles verwijderen</a>");
 writer.WriteLine("</div>");

As you can see, all we do is write out HTML. First I write out the HTML needed for the databinding of the categories and products (I removed that because it’s the same as the category one). Then some placeholders and form elements are rendered. There’s a little more HTML off course, but you get the point, NO CODE :-)

In the next part I’ll show you how to use some jQuery plugins to enhance the experience of the user and validation of the input.